The true mark of a professional-looking knitted garment often lies not just in the stitches themselves, but in the attention paid to the final details. Mastering knitting finishing techniques transforms your handmade items from good to truly exceptional. These crucial steps ensure your hard work results in a polished, durable, and well-fitting piece you’ll be proud to wear or gift. Let’s explore five essential techniques that will elevate your knitting to the next level.
Many knitters focus intensely on stitch patterns and yarn choices. However, the completion process is equally vital. Consequently, understanding how to properly finish a project can make all the difference. In fact, these methods are what separate a novice’s work from that of an experienced artisan. This guide will walk you through the most impactful steps.
1. Blocking Your Knitting Projects for Professional Results
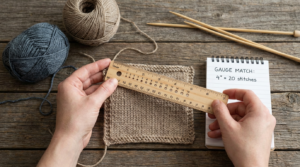
Blocking is arguably the most transformative of all knitting finishing techniques. It involves wetting or steaming your finished knitted fabric and then shaping it to its desired dimensions while it dries. This process evens out stitches, opens up lace patterns, relaxes tension, and can even correct minor sizing discrepancies. Whether you wet block by immersing your item in water, steam block with an iron, or spray block, the result is a beautifully draped and professionally finished piece. Always block a swatch first if you’re unsure how your yarn will react. For a deeper understanding, explore The Essential Step: Why Blocking Knitting Projects is Crucial.
Furthermore, blocking significantly improves the overall appearance of your knitting. It allows the fibers to bloom, creating a softer, more even fabric. Lace patterns, for instance, become much more defined and open after blocking. Similarly, cables pop with enhanced dimension. Therefore, this step is non-negotiable for many projects, especially those with intricate designs. Consider the type of fiber you’re working with, as different yarns respond differently to moisture and heat. Moreover, using blocking wires and T-pins can help achieve perfectly straight edges and precise shapes.
2. Seamless Seaming: Mastering the Mattress Stitch
For garments constructed in pieces, a neat seam is paramount. The mattress stitch is a favorite among knitters for creating invisible, flat seams that mimic continuous knitting. It’s ideal for joining two pieces of stockinette stitch horizontally or vertically. By picking up the bar between the edge stitches on both pieces and pulling the yarn tight, you create a nearly undetectable join that looks like another row of knitting. Practice this technique, and your seamed garments will look like they were knit in the round.
This particular seaming method is incredibly versatile. It works wonderfully for sweaters, blankets, and any project where you want a smooth, strong join. In addition, the mattress stitch distributes the tension evenly across the seam, preventing bulkiness. Many knitters initially find seaming daunting, but with a little practice, this technique becomes second nature. Remember to use a yarn needle with a blunt tip to avoid splitting your stitches. Also, periodically pull the seam tight as you work to ensure an even finish. This attention to detail is a hallmark of excellent knitting finishing techniques.
3. Weaving in Ends Invisibly for a Polished Look
Loose yarn ends can detract from an otherwise perfect project. Learning to weave them in securely and invisibly is essential. For most fabrics, thread the yarn tail onto a darning needle and weave it through the back of stitches on the wrong side of your work, changing direction occasionally to lock it in place. Try to weave into stitches of a similar color and texture to blend seamlessly. For extra security, split the plies of the yarn as you weave through existing stitches.
Properly securing your ends prevents unraveling and maintains the integrity of your knitted item. Furthermore, poorly woven-in ends can poke through to the right side or create unsightly bumps. Consequently, taking your time with this step is crucial. For different stitch patterns, you might adapt your approach. For garter stitch, for example, weaving along the purl bumps can be effective. For textured stitches, try to hide the ends within the texture itself. This detail is one of the most important knitting finishing techniques for a truly professional result. Consider how Preserving Your Creations: Essential Tips for Caring for Hand-Knitted Items also relies on securely woven-in ends.
4. Picking Up Stitches for Clean Edgings and Bands
Adding a collar, button band, or trim often requires picking up stitches along an edge. This technique involves inserting your needle into the fabric edge and creating new stitches. The key is to pick up the correct number of stitches evenly spaced to avoid puckering or gaping. For vertical edges, aim for about 3 stitches for every 4 rows. For horizontal edges, pick up one stitch for each cast-on or bound-off stitch. A crochet hook can be helpful for picking up stitches before transferring them to your knitting needle.
Even spacing is paramount for a neat finish. If you pick up too many stitches, the edge will ruffle; too few, and it will pull tight. Therefore, practice is key to developing an eye for even distribution. Many patterns will specify the exact number of stitches to pick up. However, understanding the general guidelines allows you to adapt. Moreover, choosing the right needle size for the picked-up stitches can also impact the final appearance. Generally, using a needle one or two sizes smaller can create a crisper edge. This skill is a fundamental aspect of advanced knitting finishing techniques.
5. Attaching Buttons and Zippers Neatly
For many garments, the final touch involves attaching closures. When sewing on buttons, use a strong thread and ensure your stitches go through all layers of the buttonhole for durability. For zippers, pin them securely in place before stitching. Use a backstitch or a small running stitch for a strong, invisible attachment. Matching thread color to the garment is also important for a professional look.
Buttons should be attached with a shank, allowing space beneath the button for the fabric of the buttonhole. This creates a neat closure without pulling. Zippers, on the other hand, require careful alignment and stitching to prevent puckering. For instance, you might use a zipper foot on a sewing machine if you’re comfortable with machine sewing. Otherwise, hand-sewing with small, even stitches works beautifully. These final touches are crucial knitting finishing techniques that complete your project. For more inspiration on what to create, consider Top Knitting Project Trends for 2024-2025: What to Make Next.
Beyond the Basics: Advanced Finishing Touches
While the five techniques above form the foundation, there are other advanced knitting finishing techniques that can further refine your work. Consider adding a knitted I-cord edge to a blanket or scarf for a clean, rolled border. This adds a subtle, elegant touch that elevates the entire piece. Furthermore, mastering various bind-off methods can also enhance your projects. For example, a stretchy bind-off is perfect for necklines or cuffs, ensuring comfort and fit.
Another valuable skill is steeking, a technique used in colorwork or circular knitting where you intentionally cut your knitting to create an opening for an armhole or cardigan front. This sounds intimidating, but with proper reinforcement and careful execution, it opens up a world of design possibilities. Moreover, understanding how to reinforce buttonholes with an extra layer of stitching prevents stretching and wear over time. These advanced methods demonstrate a true mastery of knitting finishing techniques and result in truly custom, high-quality garments.
Choosing the Right Tools for Flawless Finishing
Having the correct tools makes all the difference when applying knitting finishing techniques. A good set of blocking mats and T-pins is indispensable for achieving perfectly shaped projects. A sturdy yarn needle with a blunt tip is essential for seaming and weaving in ends, preventing accidental splitting of your yarn. Furthermore, a small pair of sharp embroidery scissors allows for precise trimming of yarn tails, avoiding frayed edges.
For picking up stitches, a crochet hook can be a knitter’s best friend, especially when working with slippery yarns or tight stitches. Additionally, a measuring tape and ruler are crucial for ensuring accurate dimensions during blocking and seaming. A steam iron or garment steamer is also highly recommended for effective steam blocking. Investing in these quality tools will undoubtedly enhance your experience and the outcome of your knitting finishing techniques. Remember, just as Finding Your Perfect Match: Choosing the Right Knitting Needle Sizes is important for knitting, so is selecting the right finishing tools.
Common Finishing Challenges and Solutions
Even experienced knitters encounter challenges with knitting finishing techniques. One common issue is uneven tension in seams. This often occurs when you pull the yarn too tightly or not tightly enough as you work the mattress stitch. The solution is consistent tension and periodically adjusting the seam as you go. Another challenge is puckering around picked-up edges. This usually means you’ve picked up too many stitches. To fix this, carefully unpick and re-do the section, picking up fewer stitches.
Ends that unravel or poke out after weaving are also frustrating. This can be prevented by weaving the ends through several changes of direction and splitting the yarn plies for extra grip. Furthermore, some yarns are more prone to shedding or fuzzing, making invisible weaving difficult. In such cases, consider using a needle-felting tool to secure the ends into the fabric. Addressing these issues proactively ensures your finished item looks its best. Ultimately, perseverance and attention to detail are key to mastering all knitting finishing techniques.
Elevate Your Craft with Expert Finishing
Mastering these essential knitting finishing techniques will truly transform your handmade projects. From the subtle magic of blocking to the seamless beauty of the mattress stitch, each step contributes to a garment that looks and feels professionally made. You’ll move beyond simply completing a project to truly perfecting it. These skills not only enhance the aesthetic appeal of your knits but also contribute to their durability and longevity. Therefore, embrace these final steps as an integral and rewarding part of your knitting journey. Happy knitting!
FAQ: Frequently Asked Questions About Finishing Knitted Items
What is the most important step in finishing a knitted project?
Blocking is often considered the most transformative step. It evens out stitches, relaxes the fabric, and helps shape the item to its final dimensions, giving it a polished and professional appearance.
How can I make my seams invisible in knitting?
The mattress stitch is highly recommended for creating nearly invisible seams. It’s particularly effective for joining pieces knit in stockinette stitch, making the seam blend seamlessly with the surrounding fabric.
Why do I need to weave in yarn ends if I’ve already tied them off?
Tying off ends only provides minimal security. Weaving them into the fabric securely prevents them from unraveling, poking out, or creating bulk. It ensures the longevity and neatness of your finished item.
What should I do if my picked-up stitches look uneven?
Uneven picked-up stitches are a common issue. You can carefully unpick the section and try again, focusing on consistent spacing. Using a crochet hook to pick up stitches first can help maintain evenness before transferring them to your knitting needle.
Are there different ways to block knitting?
Yes, there are several methods. Wet blocking involves fully immersing your item in water. Steam blocking uses steam from an iron or steamer. Spray blocking uses a spray bottle to dampen the fabric. The best method depends on your yarn fiber and the desired effect.