Welcome to the wonderful world of knitting! If you’ve ever dreamt of creating beautiful, cozy items with your own hands, the first and most exciting step is to learn basic knitting stitches. It might seem a little intimidating at first glance, but with a clear guide and a bit of practice, you’ll be forming stitches with confidence in no time. At Knit n Style, we believe everyone can knit, and we’re here to make your journey enjoyable and easy.
Getting Started: Understanding Your Tools
Before we delve into the stitches themselves, let’s briefly touch upon what you’ll need. A pair of knitting needles and a ball of yarn are your essential companions. Needles come in various materials and sizes; for beginners, smooth wooden or bamboo needles in a medium size (like 4.0mm or US 6) are often recommended as they grip the yarn slightly, preventing stitches from slipping off too easily. Yarn also varies greatly, but a smooth, light-colored worsted weight yarn (also known as aran or 10-ply) is ideal for seeing your stitches clearly. Don’t worry about perfection; just grab what feels good in your hands. For more details on choosing the right tools, consider exploring our guide on You won’t Get Far with Your Next Project Without the Best Set of Knitting Needles.
Casting On: Your Foundation Row
Casting on is the method of placing the initial loops of yarn onto your needle, creating the foundation for your project. There are several ways to cast on, but the “long-tail cast-on” is popular for its elasticity and clean edge. It involves using both your working yarn and a long tail of yarn to create the stitches.
How to do the Long-Tail Cast-On:
- Measure Your Tail: Estimate a tail length by wrapping the yarn around your needle about 10-15 times for every 10 stitches you want to cast on. Add a little extra for good measure. Make a slip knot and place it on one needle, pulling it gently snug (this counts as your first stitch).
- Position Your Hands: Hold the needle with the slip knot in your right hand. Drape the yarn tail over your left thumb and the working yarn over your left index finger, holding both ends in your palm with your other fingers. This forms a ‘V’ shape with the yarn.
- Scoop Up Yarn: Bring your needle under the yarn on your thumb, then over the yarn on your index finger. Pull the loop from your index finger through the loop on your thumb.
- Release and Tighten: Release the loop from your thumb, then pull the yarn tail gently to tighten the new stitch onto your needle. Repeat until you have the desired number of stitches.
Practicing this a few times will help you get a consistent tension, which is crucial for even fabric.
The Knit Stitch: The Heart of Knitting
The knit stitch is one of the two most fundamental stitches in knitting. It creates a fabric known as garter stitch when worked in every row, which is wonderfully squishy and doesn’t curl. This makes it perfect for scarves, dishcloths, and blankets. Many beginners find it satisfying to master this stitch first. Furthermore, understanding this stitch is key to building more complex patterns later on.
Step-by-Step Knit Stitch:
To begin, hold the needle with your cast-on stitches in your left hand. The empty needle should be in your right hand. Insert the tip of your right needle into the first stitch on your left needle, going from front to back, ensuring the right needle is behind the left needle. Next, wrap the working yarn (the yarn coming from the ball) counter-clockwise around the tip of your right needle. Carefully pull the right needle with the wrapped yarn through the loop on your left needle. Finally, slide the old stitch off the left needle. You have just completed your first knit stitch! Repeat this process across the entire row. This sequence of steps forms a foundational knitting skill.
The Purl Stitch: Adding Texture and Reversibility
Once you’ve mastered the knit stitch, it’s time to move on to its counterpart: the purl stitch. These two stitches, when combined, create various textures and reversible fabrics. For instance, alternating knit and purl stitches creates ribbing, which is excellent for cuffs and hems due to its elasticity. Understanding both is essential to truly master how to knit basic stitches.
How to Purl a Stitch:
Start by holding the needle with your stitches in your left hand and the empty needle in your right hand. Insert the tip of your right needle into the first stitch on your left needle, but this time go from back to front, making sure the right needle is in front of the left needle. Bring the working yarn between the needles to the front of your work. Wrap the working yarn counter-clockwise around the tip of your right needle. Pull the right needle with the wrapped yarn through the loop on your left needle, towards the back. Then, slide the old stitch off the left needle. Congratulations, you’ve made a purl stitch! Keep practicing until you feel comfortable with this motion.
Combining Knit and Purl: Stockinette Stitch
With both the knit and purl stitches under your belt, you can now create the ever-popular stockinette stitch. This fabric features smooth ‘V’ shapes on one side (the knit side) and horizontal bumps on the other (the purl side). It’s widely used in sweaters, hats, and many other projects. To create stockinette, you simply knit every stitch on one row and purl every stitch on the next row. This alternation is crucial for its distinctive appearance. Many beginners find this combination very rewarding.
Binding Off: Securing Your Work
After you learn basic knitting stitches and complete your project, you’ll need a way to secure your stitches so they don’t unravel. This process is called binding off (or casting off). It creates a neat, finished edge and is the final step in most knitting projects. Learning to bind off is just as important as learning to cast on.
Step-by-Step Binding Off:
First, knit two stitches. Then, using your left needle, lift the first stitch over the second stitch and off the right needle. You now have one stitch remaining on your right needle. Next, knit one more stitch. Again, lift the first stitch over the second stitch and off the right needle. Continue this process until only one stitch remains on your right needle. Finally, cut your yarn, leaving a tail of about six inches. Pull this tail through the last remaining loop and tug gently to tighten. Your work is now securely bound off.
Troubleshooting Common Beginner Issues
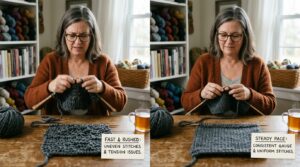
It’s perfectly normal to encounter a few bumps in the road when you first start to knit. Don’t get discouraged! One common issue is uneven tension, which can make your fabric look a bit bumpy. The best remedy is consistent practice; your hands will naturally learn to maintain an even grip. Another frequent problem is accidentally dropping a stitch. If you notice a loose loop below your needle, don’t panic! There are tools like crochet hooks that can help you pick up dropped stitches. Similarly, if you add an extra stitch by mistake, it can often be corrected by knitting two stitches together on the next row. Remember, every knitter has made these mistakes, so keep trying. You will eventually be able to confidently Knitting Stitches for Beginners – The Best Place to Start.
Practice Makes Perfect: Simple Projects to Start
Now that you’ve started to learn basic knitting stitches, it’s time to put your new skills to the test with some simple projects. Starting with small, manageable items will build your confidence and help solidify your understanding of the stitches. For example, a garter stitch scarf is an excellent first project. It only requires you to knit every row, allowing you to focus on consistent tension and stitch formation. Dishcloths are another fantastic option, as they are small, practical, and can be made with simple knit and purl combinations. Furthermore, creating a simple coaster can be a quick and satisfying win. These projects are not only great for practice but also result in useful handmade items. Many free patterns are available online, making it easy to find inspiration. You can also explore various All You Need to Know About Knitting Patterns and More for more ideas.
Expanding Your Knitting Horizon
Once you feel comfortable with the core techniques, a vast world of knitting possibilities opens up. You can explore different yarn weights and fibers, experiment with various needle types, and delve into more intricate stitch patterns. For instance, learning to knit in the round allows you to create seamless items like hats and socks. Additionally, understanding how to read knitting patterns will unlock a multitude of project ideas. There are countless resources available, from books to online tutorials, to guide you further. As you continue to practice, your skills will undoubtedly grow, and you’ll find yourself tackling more complex and rewarding projects. Keep practicing your knitting fundamentals, and soon you’ll be creating beautiful handmade items with ease. Keep in mind, the journey of knitting is continuous learning and exploration.
The Joy of Creating: Why Knitting is So Rewarding
Knitting is more than just a craft; it’s a journey of creation, relaxation, and personal expression. The rhythmic motion of the needles can be incredibly meditative, offering a calming escape from daily stresses. There’s immense satisfaction in seeing a skein of yarn transform into a tangible, beautiful object made with your own hands. Whether you’re making a gift for a loved one or a cozy item for yourself, the act of knitting imbues each piece with a unique story and personal touch. Moreover, knitting connects you to a global community of crafters, allowing you to share ideas, seek advice, and celebrate achievements. It’s a skill that provides endless opportunities for creativity and a deep sense of accomplishment. Therefore, dedicating time to learn basic knitting stitches is an investment in a fulfilling hobby.
Advanced Techniques to Explore Later
As you progress beyond the basics, you might be interested in exploring more advanced techniques. For example, cabling creates beautiful textured patterns that resemble braided ropes. Lace knitting involves creating openwork designs through a combination of yarn overs and decreases. Colorwork, such as fair isle or intarsia, allows you to incorporate multiple colors into your projects, creating intricate designs and pictures. Steeking, while intimidating to some, is a technique used to cut knitted fabric without unraveling, often for creating cardigans from tubes. These techniques require a solid understanding of the foundational stitches, so focus on mastering how to make knit and purl stitches first. The Spruce Crafts offers further insights into a variety of stitches. You’ll find that the more you practice, the more confident you’ll become in tackling these exciting challenges.
Maintaining Your Knitting Journey
To ensure a continuous and enjoyable knitting journey, it’s beneficial to establish good habits. Firstly, always keep your yarn and needles organized to avoid tangles and lost items. Secondly, take breaks during long knitting sessions to prevent hand strain and fatigue. Stretching your hands and wrists regularly can also be very helpful. Thirdly, don’t be afraid to unravel your work if you make a significant mistake; it’s often easier to fix an error by starting over a small section than trying to mend it later. Many experienced knitters refer to this as “frogging.” Furthermore, joining local knitting groups or online forums can provide a supportive community for sharing tips and tricks. By embracing these practices, you’ll find that your knitting experience becomes even more rewarding. Finally, remember that consistency in practice is what will truly help you master how to knit basic stitches and beyond. For more inspiration and resources, check out Purl Soho, a well-known resource for knitters.
Conclusion: Your Crafting Adventure Begins Now
Embarking on the journey to learn basic knitting stitches is a rewarding experience that opens up a world of creativity and personal satisfaction. We’ve covered the essential tools, the foundational techniques of casting on, knitting, purling, and binding off, and even touched upon troubleshooting and expanding your skills. Remember, every knitter, no matter how experienced, started exactly where you are now. Patience, practice, and a willingness to learn are your best assets. At Knit n Style, we are thrilled to be a part of your crafting adventure. So grab your needles, pick out some yarn, and start creating! You’ll be amazed at what you can accomplish with just a few simple stitches. Enjoy the process of learning to knit basic stitches and watch your confidence grow with every project.
FAQ:
What are the absolute essentials to begin knitting?
To start knitting, you primarily need a pair of knitting needles and a ball of yarn. For beginners, medium-sized wooden or bamboo needles and a smooth, light-colored worsted weight yarn are highly recommended.
How do I make sure my stitches are even?
Achieving even stitches comes with practice. Focus on maintaining consistent tension on your yarn as you form each stitch. Don’t grip too tightly or too loosely, and try to keep your movements fluid and even. Regular practice will naturally improve your consistency.
What’s the difference between the knit and purl stitches?
The knit stitch creates a ‘V’ shape on the front of your fabric, while the purl stitch creates a horizontal bump. When you knit every row, you get garter stitch. When you alternate knitting one row and purling the next, you get stockinette stitch, which has a distinct front and back side.
What if I drop a stitch?
Dropping a stitch is common for beginners. Don’t worry! If you notice it quickly, you can often pick it up using a crochet hook or even your fingers. There are many online tutorials specifically for fixing dropped stitches, which can be very helpful.
What is a good first project after learning the foundational stitches?
A garter stitch scarf or a simple dishcloth are excellent first projects. They allow you to practice your casting on, knit stitch, and binding off without the complexity of shaping or intricate patterns. These projects are quick to complete and provide a sense of accomplishment.